
Figma to WordPress Component Mapping
Mastering the Translation: Bridging Figma Components to WordPress Blocks
The core challenge of converting a design from Figma to WordPress lies not in the tools, but in the logical mapping of figma components to WordPress blocks. This process, often called design mapping, requires a designer or developer to interpret the visual hierarchy created in Figma and reconstruct it functionally within the WordPress ecosystem, ensuring that spacing, typography, and interactions remain consistent from the prototype stage to the live site.
When you initiate a project using services like the Figma2WP Service, the initial step is a rigorous audit of your design file to ensure every layer is named and organized, which significantly accelerates the design mapping process. Without this foundational organization, the translation of figma components wordpress can become error-prone, leading to a site that diverges from the original vision.
Why Design Mapping is Critical for Modern Web Development
In the rapidly evolving landscape of web development, the gap between design and deployment is widening. Design mapping serves as the bridge that ensures the fidelity of your design is preserved. When you use tools like UiChemy or Yotako, the software attempts to automate this mapping, but human oversight is required to correct nuances that AI might miss, such as complex grid interactions or custom CSS animations.
The ability to effectively map figma components to WordPress determines whether your site is merely functional or truly exceptional. Whether you are building a blog for a client in the USA, an e-commerce site for a business in the UK, or a portfolio for an artist in Canada, the principles remain the same. A robust design mapping strategy ensures that your site is scalable, accessible, and aligned with your brand identity.
For those seeking a streamlined approach, the Contact Us page is your gateway to expert guidance on how to best structure your designs for seamless conversion.
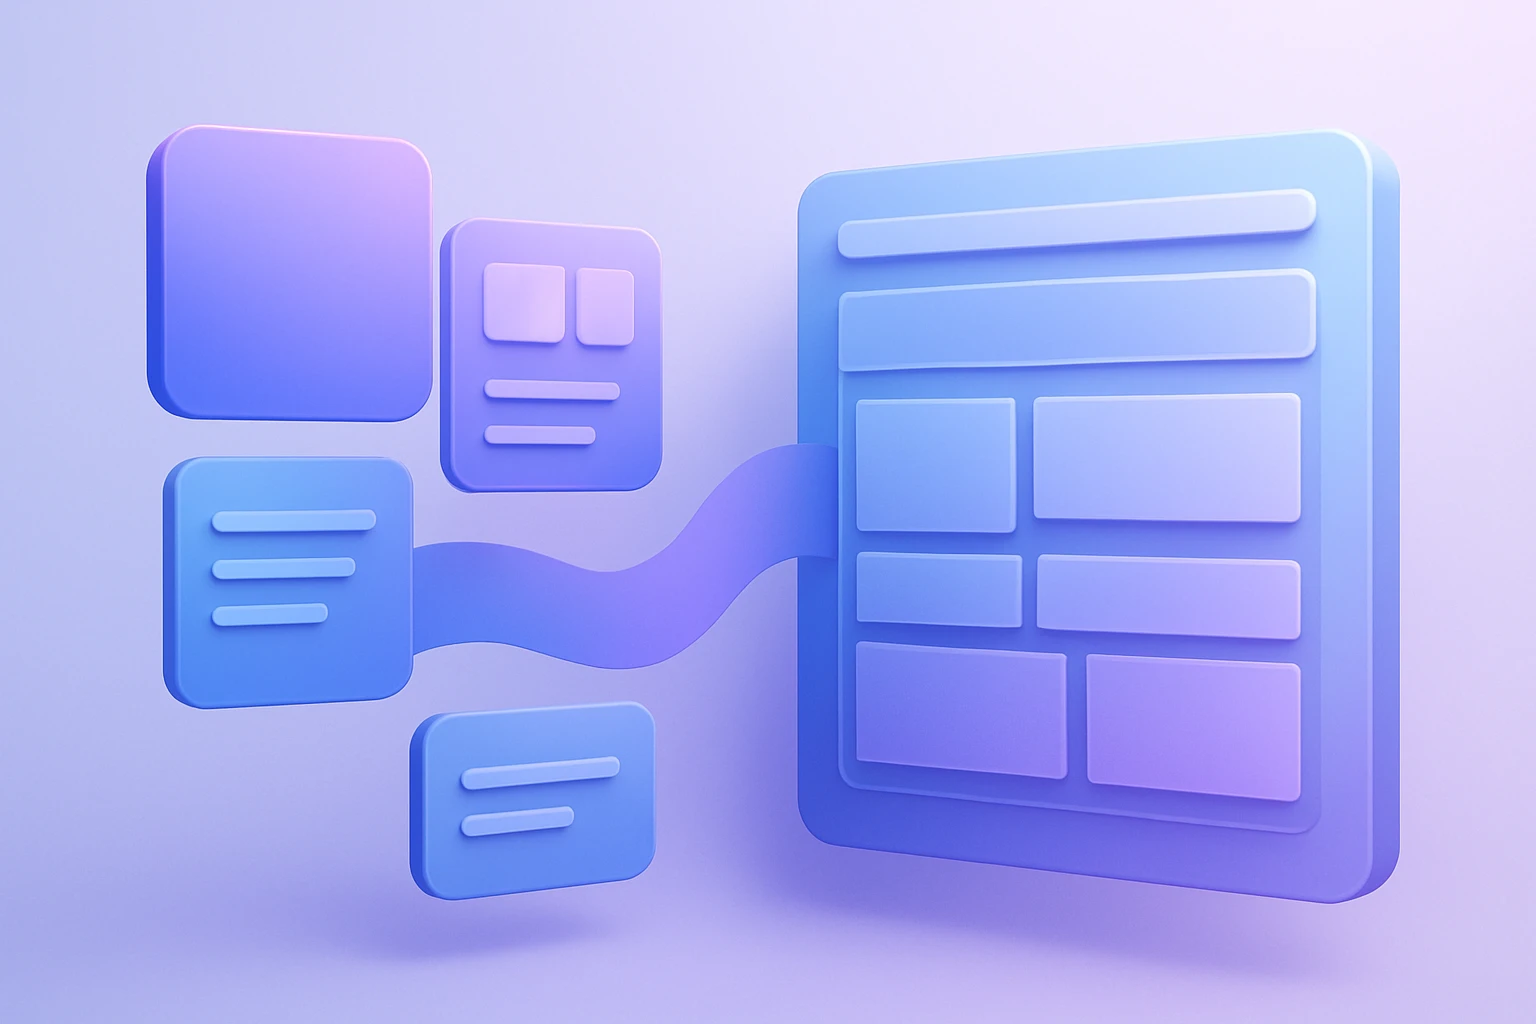
Understanding the Anatomy: Figma Layers vs. WordPress Blocks
To successfully execute design mapping, you must first understand the fundamental structural differences between figma components and WordPress blocks. In Figma, a component is a reusable instance of a design element, defined by layers, groups, and properties like fill, stroke, and effects. In contrast, a WordPress block is a functional unit that renders HTML, CSS, and potentially JavaScript, often managed through the Gutenberg editor or a page builder like Elementor.
The Role of Naming Conventions in Seamless Mapping
One of the most critical aspects of design mapping is the use of clear naming conventions. When you name your layers in Figma as “Header-Section” or “Button-Primary,” the conversion tools (like Droip) can more accurately identify and map these elements to the correct WordPress blocks. Without this, the system might default to generic block types, resulting in a fragmented layout that requires manual rework.
Consider the following best practices for naming your components:
- Use Descriptive Names: Instead of “Layer 1,” use “Hero-Image-Container.”
- Group Related Elements: Group all elements within a section (e.g., “Hero-Section”) into a single frame in Figma to simplify the mapping process.
- Standardize Component Names: Use a consistent naming pattern for repeated components (e.g., “Card-Product,” “Card-Service”) to enable the tool to recognize and replicate them efficiently.
These practices are essential when leveraging the Figma2WP Service to ensure your final site is a perfect reflection of your Figma design.
Mapping specific Figma Components to WordPress Blocks
Let’s break down how specific figma components are typically mapped to WordPress blocks during the design mapping process:
| Figma Component | Target WordPress Block | Mapping Considerations |
|---|---|---|
| Header Section | Group Block / Header Block | Ensure navigation links and logo are correctly linked to the WordPress menu system. |
| Hero Image | Image Block / Cover Block | Check for responsive sizing and overlay text alignment. |
| Button Component | Button Block | Verify hover states, padding, and color consistency with Figma styles. |
| Card Layout (Product/Service) | Columns Block / Custom Block | Ensure image, title, and description stack correctly on mobile devices. |
| Footer Section | Group Block / Footer Block | Map social links and copyright text to the footer template. |
This table illustrates the nuance required in design mapping. It is not just a simple copy-paste; it requires a deep understanding of how the design elements will function within the WordPress environment. For instance, a “Button Component” in Figma might have a shadow effect that needs to be recreated using CSS in WordPress, or a “Card Layout” might need to be converted into a reusable block for consistency across the site.
Tools and Plugins: Automating the Design Mapping Process
While manual coding is always an option, the industry has developed several powerful plugins and tools to automate the design mapping process, making it easier to convert figma components to WordPress. These tools leverage AI and advanced algorithms to interpret your Figma design and generate the corresponding WordPress code.
Top Plugins for Converting Figma to WordPress
Here are some of the most recommended tools for design mapping and converting figma components wordpress:
- UiChemy: This plugin is renowned for its ability to export Figma designs directly into Elementor blocks. It allows for precise control over the mapping process, ensuring that your design is translated accurately.
- Yotako: Yotako converts entire Figma layouts into installable WordPress themes. It is particularly useful for larger projects where a full theme conversion is required.
- Droip: Droip offers a seamless integration between Figma and its own page builder, allowing users to paste Figma designs directly into the Droip canvas for refinement.
- Figma to WordPress Plugin: This AI-based tool analyzes your design and converts it into a WP theme, streamlining the entire process from design to deployment.
- Elementor: While primarily a page builder, Elementor has built-in features and community plugins that facilitate the import of Figma designs, making it a versatile choice for design mapping.
Each of these tools has its strengths and weaknesses, and the best choice depends on your specific project requirements. For example, if you are using Elementor, UiChemy might be the most suitable option, whereas if you need a full theme, Yotako could be more appropriate. Regardless of the tool you choose, the design mapping process is the key to ensuring a successful conversion.
How AI is Revolutionizing Design Mapping
Artificial Intelligence (AI) is playing a pivotal role in the evolution of design mapping. AI-powered tools can now analyze complex Figma designs, including nested layers, custom effects, and interactive elements, and automatically generate the corresponding WordPress code. This not only speeds up the process but also reduces the likelihood of errors, making it easier for developers to focus on refining the design rather than recreating it from scratch.
For instance, the Figma to WordPress AI model can identify recurring patterns in your design and create reusable blocks in WordPress, ensuring consistency across your site. This level of automation is transforming the way designers and developers work together, making the design mapping process more efficient and reliable.
If you are looking to take advantage of these AI-driven solutions, the Figma2WP Service offers expert support to help you navigate the best tools and strategies for your project.
Manual Methods: When to Code by Hand and How to Map Components
While automation is powerful, there are scenarios where manual coding is the preferred approach, especially when dealing with highly custom designs or complex interactions that automated tools cannot fully replicate. In these cases, understanding how to map figma components to WordPress blocks manually is essential.
The Step-by-Step Manual Conversion Process
Here is a detailed guide on how to manually convert figma components to WordPress using the design mapping process:
- Finalize Your Figma Design: Ensure all layers are named, grouped, and organized. This is the foundation of successful design mapping.
- Export and Optimize Assets: Export images, icons, and fonts from Figma. Optimize them for web performance to ensure your site loads quickly.
- Select Your Conversion Method: Determine whether you will use a page builder (like Elementor or Kadence) or code a custom theme. This decision will guide your mapping strategy.
- Rebuild or Import into WordPress: If using a page builder, drag and drop elements to match your Figma arrangement. If coding manually, create the HTML structure and apply CSS styles to replicate your design.
- Optimize for Performance and Accessibility: Test your site on various devices and screen sizes. Ensure that all images have alt text and that your heading structure follows a logical sequence for search bots.
This manual process requires a deep understanding of both Figma and WordPress, but it offers the greatest flexibility and control over the final output. By following these steps, you can ensure that your design mapping is accurate and that your site is a true reflection of your Figma design.
Common Challenges in Manual Mapping and How to Overcome Them
Manual design mapping can present several challenges, such as:
- Complex Grids: Figma grids may not translate perfectly to WordPress. Use custom CSS to recreate the grid structure accurately.
- Custom Effects: Shadows, gradients, and animations in Figma may require custom CSS in WordPress to replicate the same effect.
- Interactive Elements: Hover states, clicks, and other interactions in Figma need to be coded using JavaScript or CSS in WordPress.
To overcome these challenges, it is essential to have a strong understanding of both Figma and WordPress. Additionally, using tools like ShortPixel for image optimization and WP Rocket for performance can help ensure your site is fast and efficient.
If you find manual mapping too time-consuming or complex, the Contact Us page is the best place to get expert assistance from the Figma2WP Service.
Best Practices for a Flawless Design Mapping Workflow
To ensure a successful and efficient design mapping process, it is important to follow best practices that have been proven to work across various projects. These practices not only improve the quality of your final site but also streamline the workflow between designers and developers.
Key Strategies for Efficient Design Mapping
Here are some key strategies to follow for a flawless design mapping process:
- Use Figma Components and Styles: Create reusable components and styles in Figma to maintain consistency and reduce the need for manual adjustments in WordPress.
- Keep Layers Named and Organized: Name your layers clearly and group related elements together. This makes it easier for conversion tools to map your design accurately.
- Test Responsiveness Early: Check your design on different screen sizes in Figma to ensure it will translate well to WordPress. Make adjustments before starting the design mapping.
- Document Your Design: Create a style guide in Figma that outlines your typography, colors, and spacing. This will help developers replicate your design accurately in WordPress.
- Collaborate with Developers: Involve developers early in the process to discuss mapping strategies and potential challenges. This collaboration ensures a smoother transition from design to deployment.
By following these best practices, you can ensure that your design mapping process is efficient and that your final site is a high-quality representation of your Figma design. For additional support and expert guidance, the Figma2WP Service is your go-to resource for all your figma components wordpress needs.
Ensuring Accessibility and Performance in Your Mapped Site
Accessibility and performance are critical aspects of any website, and they should be considered during the design mapping process. When mapping figma components to WordPress, ensure that your site is accessible to all users, including those with disabilities.
To achieve this:
- Use Semantic HTML: Ensure that your HTML structure is semantic and follows best practices for accessibility. Use proper heading tags (H1, H2, H3) and label all images with alt text.
- Optimize Images: Use tools like ShortPixel or Smush to optimize images for web performance. This will help your site load faster and reduce the risk of performance issues.
- Test for Compatibility: Test your site on various browsers and devices to ensure it is compatible and accessible to all users.
- Use Accessibility Plugins: Consider using plugins like WP Accessibility to enhance the accessibility of your site.
By prioritizing accessibility and performance during the design mapping process, you can create a website that is not only visually appealing but also functional and user-friendly for everyone.
Real-World Case Studies: Success Stories in Design Mapping
To illustrate the power of effective design mapping, let’s explore a few real-world case studies where the conversion of figma components to WordPress was successfully executed.
Case Study 1: E-Commerce Site for a UK Retailer
A UK-based retailer needed to convert their Figma design into a fully functional WordPress e-commerce site. The project involved mapping complex grid layouts, custom product cards, and interactive elements. Using the UiChemy plugin, the team was able to automate much of the design mapping process, but manual adjustments were required for the custom product cards to ensure they displayed correctly on mobile devices.
The final site was a success, with the retailer reporting a 30{75933116aeeb03ee8a3ec72bbd3559c30611f97271ef63810777e59368b3946f} increase in online sales within the first month. The key to this success was the meticulous attention to the design mapping process, ensuring that every detail from the Figma design was accurately translated into the WordPress environment.

More From Our Blog
Transforming Visual Design into Scalable Code with Design Tokens The handoff from designer to developer has historically been one of the most painful bottlenecks in web projects, often resulting in inconsistent colors, mismatched typography, and hours of manual refront. However, the integration of design tokens into a WordPress workflow using Figma tokens has revolutionized this Read more…
If you are planning a figma ui kit to wordpress ui system workflow, the fastest path is to design for WordPress from the start instead of treating WordPress like a post-production tool. A well-structured UI kit in Figma can translate into reusable WordPress templates, global styles, and block patterns that are easier to maintain and Read more…